100 Stories
Triplet Peaks: When Just One Isn’t Enough

095 / 100
Japan is undoubtedly a country of mountains, but the bulk of the mesmerizing summits is located in Central Japan. In contrast, the peaks around these parts just can’t seem to compare in terms of elevation, so hikers may not even bat an eye in our direction. The few mountains of significance in Hiroshima Prefecture tend to be in the northerly Geihoku and Bihoku areas, which are a bit of a stretch for international tourists to access. That’s not to say that we don’t have good hiking spots in our more vibrant, coastal cities, however. Miyajima has Misen, Kure has Yasumiyama, and Mihara has Mt. Fudekage, but in my experience as an amateur hiker, the aforementioned summits tend to be on the low side. The hiking trails of Misen had been (and continue to be) my training grounds for climbing mountains, but even those are ceasing to be a challenge, and walking up Misen via the Momijidani Course is little different than walking through Momijidani Park itself. To quell my yearning for a harsher hike near Hiroshima City, rather than propose one new mountain, how about I pitch three at once?
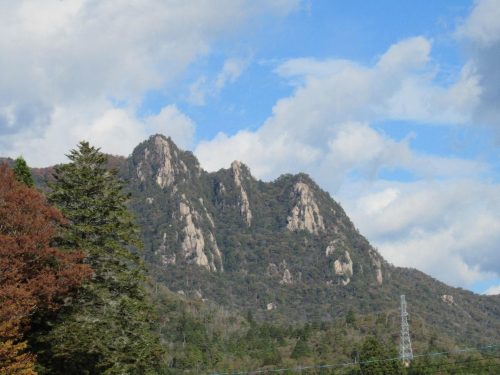
The city of Otake, situated on the western cusp of Hiroshima Prefecture, isn’t exactly a name that jumps out to tourists, international or domestic, but when one mentions it, there’s one site (if any at all) that comes to mind: Mikuradake. People who even know the name Otake at all probably learned about it thanks in part to Mikuradake, which is a mountain chain of three peaks (from right to left): Asahidake, Nakadake, and Yuhidake, with trails connecting to each other. Originally, it was possible to seamlessly hike from summit to summit to summit, but due to the torrents caused by heavy rains in the summer of 2018, the trail connecting Nakadake to Yuhidake was eroded and the entrances subsequently blocked off. It’s still physically possible to traverse that length of mountainside, but just not ergonomic since there’s no path, and to put it bluntly, there’s a chance you could fall and die. Instead, hikers are advised to climb back down from Asahidake or Nakadake and start their ascent up Yuhidake from near the bottom. In spite of all that though, climbing these triplets is more than doable in the span of a day, even with the train and bus rides all the way from Hiroshima Station included.

Mikuradake Approach
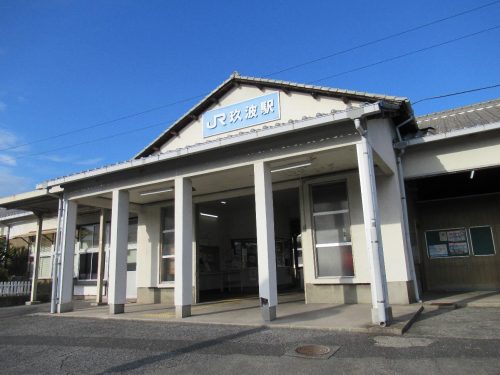
The three-pronged range is located in Otake, but Otake Station would be the wrong transfer point. Rather, take the Red Sanyo Line from Hiroshima Station to Kuba, the station before Otake. If starting from downtown, take the Astram Line to Shin-Hakushima Station, then transfer to a JR train headed in the same direction. There’s a bus just outside Kuba Station’s east exit that takes travelers to a stop a bit away from the base of the mountain, but the walk to the mountain is a cakewalk compared to the actual hike. That bus departs at different times depending on whether it’s a weekday or a weekend/national holiday; I went on Sunday when the bus departs at a later 9:10 a.m., so shoot for one of those days.
After munching on a morning snack while awaiting my ride, a cute, rounded, sky blue bus arrived on the scene and invited me onboard. The closest bus stop to Mikuradake is called 栗谷支所前 (くりたにししょまえ – Kuritani Shisho-mae), but as this little vehicle has no buzzer, you’d do well to tell the bus driver beforehand exactly where you intend to alight so that he can stop and charge you accordingly. Then again, the odds that someone riding that bus wants to hike Mikuradake aren’t exactly zero, so should you fail to mention it, as the bus approaches the mountains, the driver may ask (in Japanese) if anyone is getting off at Kuritani Shisho-mae. He asked me even when I said so before departure, so I responded affirmatively, got my cash ready (no IC cards accepted here), paid the man, and hopped off.
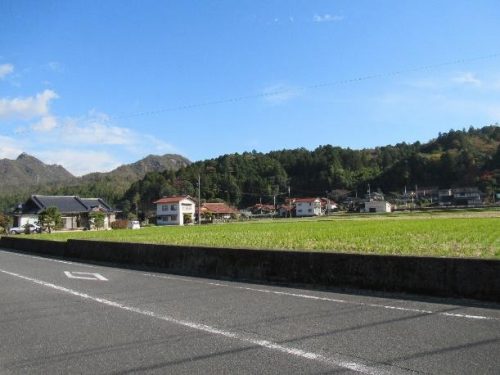
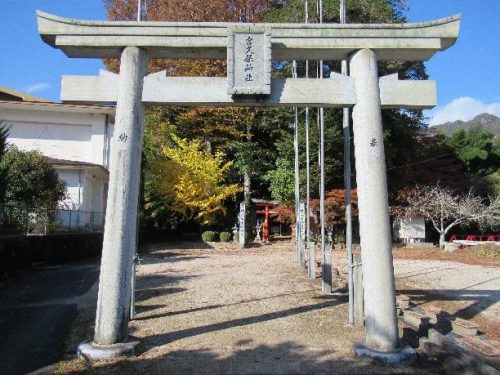
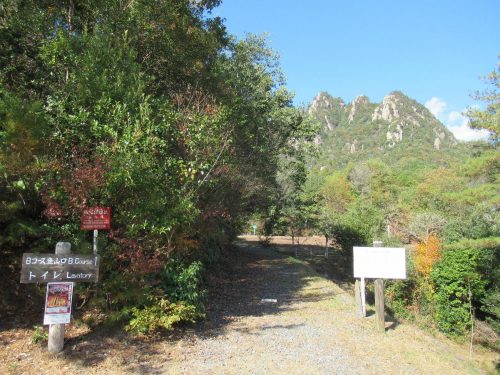
The first thing to greet visitors stepping off the bus would probably be Mikuradake looming in the middle distance. Signs also point the way to the hiking trail, but approaching Mikuradake is really as easy as crossing the streets and walking towards the mountains. This area is kind of in the middle of nowhere, with practically no eateries nearby or at the foot of the mountain, so pack a light lunch to eat during the hike. I passed rice fields on my right as well as Miyakubo Shrine on my left as I worked my way to Mikuradake Prefectural Natural Park, encountering some vibrant plant life along the way, and eventually, I came upon the starting point of the “A Course,” which is better off skipped at this point in time.
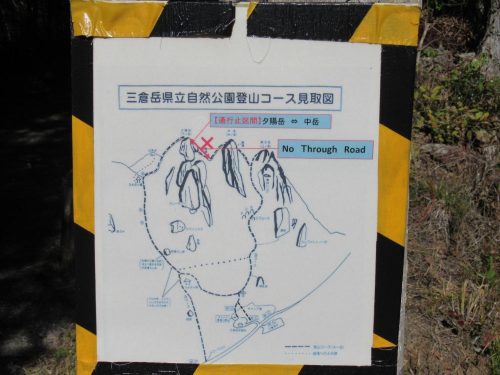
Indeed, the “A Course” is a straight shot to Yuhidake, but as the warning sign above indicated, there was no thoroughfare to the other peaks, so I opted to begin my hike on the Asahidake side via the “B Course.” Thus, I continued straight until I came upon a hub with a parking lot, picnic spaces, and public toilets. To the left was a vivid red tunnel of maple trees welcoming me up a winding incline to the start of the trail.
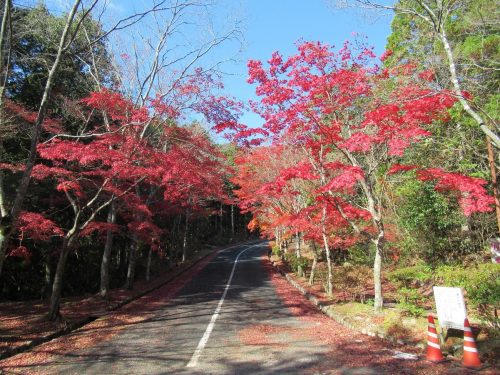
Along this road, photography enthusiasts will have a plethora of opportunities to shoot the autumn foliage and a clear profile of Mikuradake up ahead. The last public restroom before the start of the “B Course” is also on this slope, so make an effort to do some business, whether you feel the urge or not. From there, one can either immediately start on the trail, or keep going up the slope to reach the Tourist Information Center and yet another parking lot. The information center is a decent place to take a breather either before or after hiking, but more importantly, there’s an emergency contact form tourists can fill out in case they get stuck in the mountains and others are struggling to find them. However, there’s a disclaimer before the start of the trail stating that Softbank users will have bad reception on Mikuradake. Being a Softbank user myself (as well as physically fit enough to conquer the triplet peaks no problem), I decided to forego submitting a form, but if you have a cell phone with Docomo or au, feel free to give them your contact information, just in case.
Asahidake and Nakadake
It was about high time (no pun intended) I started the B Course, so I passed over the rope here and made tracks for Asahidake. To spice things up, I started a timer on my wristwatch the moment I began hiking in order to have a record of how long it took me to reach each peak. The trail leading up to Asahidake and Nakadake was roughly the same up until a fork near both summits, at which point hikers follow the sign to the peak they wish to conquer first. Up until that point, though, the trail is marked with checkpoints so hikers can monitor their progress and estimate their time of arrival at any of the summits. The peaks of Mikuradake stand at about 702 meters high, but both the A Course and the B Course consist of a lot of stairs, and the mountain faces are steep enough for rock climbing enthusiasts to frequent all three peaks. Despite the hardships involved in climbing three mountains, though, I found that with deliberate, deep breaths while climbing (even with a face mask on), I was able to maintain a steady pace on the trails.
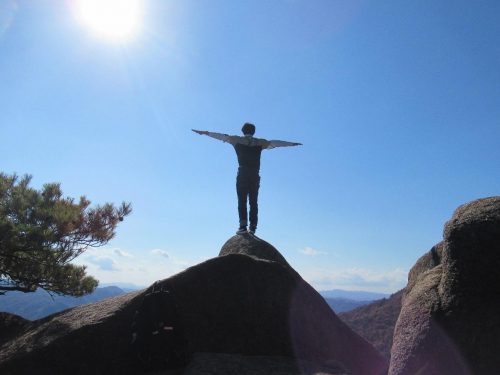
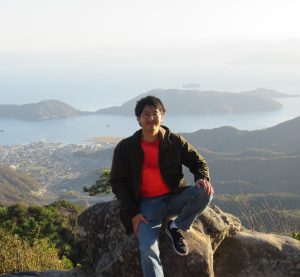
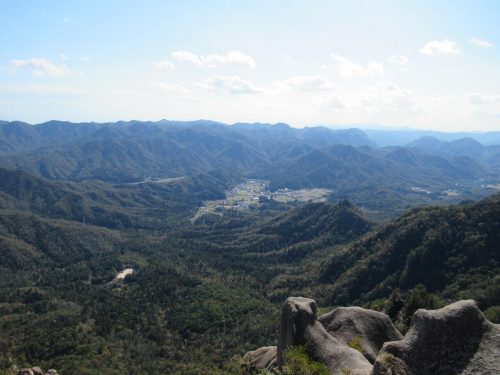
I know myself to be a rather speedy mountain climber, so when I look up approximate times for hiking anywhere, I typically subtract 30 to 45 minutes to know how long I’d take to reach the end. That being said, when I stopped my timer upon reaching the summit of Asahidake, I found that a mere 32 minutes, 20 seconds had elapsed since I started from the bottom, a result that shocked even me! I felt so accomplished, I asked a passerby to photograph me in a triumphant pose because I was feeling like a winner. To say that the view from this summit (and the other two) was fantastic would be an understatement. The vast blue and green expanses above and below seemed to engulf me wherever I turned my head, from the adjacent Nakadake on my right-hand side to the information center in the distance with its distinct parking lot.
Once I’d had my fill of wistfully staring outward, I descended from the rock, restarted my timer, and made a beeline for Nakadake. Elevation-wise, from this point, it wasn’t at all trying to climb to the second summit, but some tourists might find the chains leading up the otherwise impassable boulders to be a rigorous ordeal. There are metal rungs embedded into the segment near the bottom of the rock wall, and with a tight grip on the chains and stable arms pulling the rest of the body upward, you shouldn’t be spinning or wriggling around too much. Those who find the chains cumbersome may instead choose to grab and step on the tree roots for support, but not all tree roots are equal and it pays to test which ones wobble before putting body weight on any of them.
As anyone would expect, I made it to the top of Nakadake safe and sound as well, and the transfer took little to no time at all. According to my timer when I stopped it, it took me 13 minutes and 41 seconds to get to the top of the second peak, and that was me stuck behind a group of fellow hikers, causing me to wait and go a little more slowly than I’d planned. It was getting close to noon at this point, but I wasn’t anywhere near tired or hungry enough for lunch, so after admiring Asahidake on my left and Yuhidake on my right, I hastily turned back, restarted my timer, and rappelled down the chained path en route to the final summit of the day.
Detour to Yuhidake
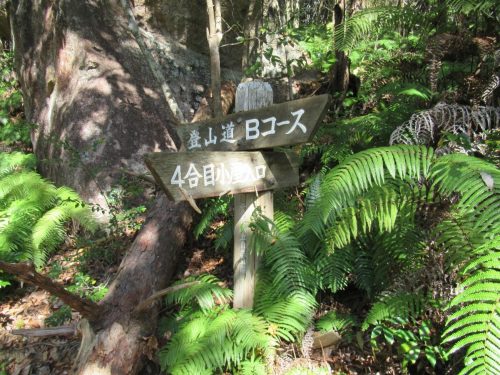
I had to backtrack all the way back to the fourth checkpoint before I could transfer to the A Course that leads to Yuhidake. The path between the two courses was disheveled and not well defined, and it was only here that I encountered a wild snake that quickly fled from my field of vision. When I found myself on the other trail, there was a sign pointing to a mountain shelter; that’s in the wrong direction, so it’d serve better for those who wish to descend via the A Course.
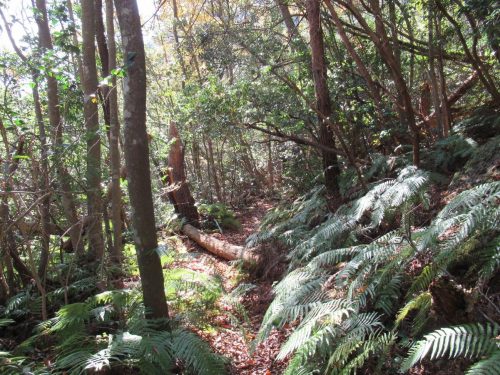
Going up countless stairs once again after having come down hundreds of steps just to switch courses can prove to be a trial on the legs, but I came to Mikuradake specifically for the physical challenge, so my body was ready. Just like with the former two peaks, Yuhidake also sees its fair share of rock climbers enjoying the mountains by harness. Once near the summit, hikers will see a sign pointing in two directions: the left leads to a Triangular Point, which a nearby hiker said had an underwhelming view, and the right leads to the top of Yuhidake, which is what I actually came for. I hurried to the end of the trail and stopped my timer to see the grand total for climbing all three peaks. In between descending, transferring, and ascending once more, only 59 minutes and 39 seconds had passed, meaning that traversing Asahidake, Nakadake, and Yuhidake took me approximately one hour, 45 minutes. That’s an average of 35 minutes per peak, and I’m positive I can shave down that time on subsequent journeys now that I know how to go about the paths.
Moment of Joy: Roof of Otake
It was only now that I truly felt my tummy rumble, so I climbed out towards what I believed was the safest rocky outcrop jutting over the landscape, sat down, and took a well-deserved lunch break. This corner put some distance between me and other hikers who reached the summit, so I could wolf down my meal with minimal intrusions as I gazed down at where I had come from. I looked to my left to see Asahidake and Nakadake, which I just conquered, and breathed a sigh of relief knowing that the hardest parts of my hike were over. Climbing Mikuradake much more quickly than I had anticipated left me with a lot of time on my hands, so I fully exploited that time up here and took it slow for the rest of the day.
Dinner in Town
When going down from Yuhidake, rather than take a straight shot past the aforementioned mountain shelter and out of Mikuradake Prefectural Natural Park, I instead took the long road by heading back to the B Course and meandered at a leisurely pace, while still keeping an eye on my timer to ascertain the duration of a round trip. I stopped my timer once I reached the public toilets by where the course begins, and found that the descent only took me 33 minutes. Honestly, I was expecting to have taken longer, but after using the restroom I was so much at a loss for what to do while waiting for the return bus that I actually re-entered the trail to walk down some unexplored paths and pass the time. When it felt right, I made my way back to Kuritani Shisho-mae to await my ride back to Kuba Station. The timing of the bus ride couldn’t have been better as dusk was upon us by the time I arrived back in Kuba.

My lunch was exceptionally light, and the setting sun was making me want dinner, so I figured I’d swing by a preferred café of mine in Otake City: Silvia Coffee. A couple years ago, they had another branch right off of Hondori, and it was my go-to joint for breakfast and a fancy drink, but now that the downtown Hiroshima store is closed, the branch in Otake is all that’s left, so I make an effort to eat here whenever I happen to be around these parts. It’s only a twenty-something-minute walk south of Kuba Station, which now felt beyond easy after today’s hike. Just cross some bridges, hug the seawall on the left, and walk past some factories until you start to see signs for shopping centers up ahead. Silvia Coffee is right next to a discount supermarket and open until 7:00 p.m.

Breakfast is actually the best deal here since the food is free with any drink order, but every other food item on the menu is worth the price. I intended to make up for every Calorie I burned today, and then some, so I got myself a fried chicken cutlet sandwich on toasted bread, coupled with a tall glass of iced cocoa that came topped with a dollop of heavenly, rich whipped cream. Eating the whipped cream was as pleasurable as drinking the cocoa because it’s thick enough to require a spoon, unlike the runny whipped cream you spray from a can. Every order also comes with a complimentary pack of rice crackers (for those who only ordered a drink), but considering the sheer amount of food I was stuffing my face with, I just took that pack to go.

I still wasn’t satisfied after the sandwich, so to round off my dinner, I got myself a mini pancake for dessert. This one came topped with a scoop of vanilla ice cream, yet another dollop of that whipped cream I adore, and some berry sauce and frozen raspberries for a fruity kick. The pancake and iced cocoa went hand in hand, and I shamelessly gobbled down every last bite. Anyone who endured the task of climbing three mountains in succession deserves a feast like this, so I urge you to give Silvia Coffee a whirl, either before or after your Mikuradake excursion. The icing on the metaphorical cake is that customers can take a bag of bread crusts (the ends of the loaves that they don’t serve to customers) to go after paying, so the gourmet gorging doesn’t have to stop in the café!

Tourists wanting to hike in the Hiroshima area will probably have Miyajima’s Misen on their minds first and foremost, but if you’ve done that already and found it lacking in substance, perhaps it’s time to graduate from Misen and climb something a little more challenging. To those tourists, I would like to advocate pushing oneself to the limit with three peaks in one sitting at Mikuradake. After all, “no pain, no gain,” and the trials awaiting here in Otake will serve as sufficient training should you decide to tackle even higher mountains in this corner of Japan, such as Daisen in Tottori Prefecture or Mt. Ishizuchi in Ehime Prefecture. Although Mikuradake has a relatively low elevation and doesn’t take as long as more serious hikes in other regions, the unique concept of back-to-back-to-back climbs is worth trying at least once. If you’re traveling in Hiroshima, love mountains, and don’t mind a physical challenge, remember the name Otake and you’ll triple your fun factor; it just adds up.